There's a particular look students get when you first put the parallel axis theorem on the board. It's not confusion, exactly — it's the quiet dread of someone watching a single clean idea disappear under a pile of subscripts. I-bar plus A-d-squared. Sum over every piece. Don't forget to shift each one back to the centroid. By the third sub-rectangle of an I-beam, half the room has stopped following the geometry and started copying symbols.
The frustrating part is that the geometry was never the hard bit. A centroid is just a balance point. The second moment of area is just "how far is the material from the axis, and how much of it is out there." Those are intuitive, almost physical ideas. We just bury them in arithmetic.
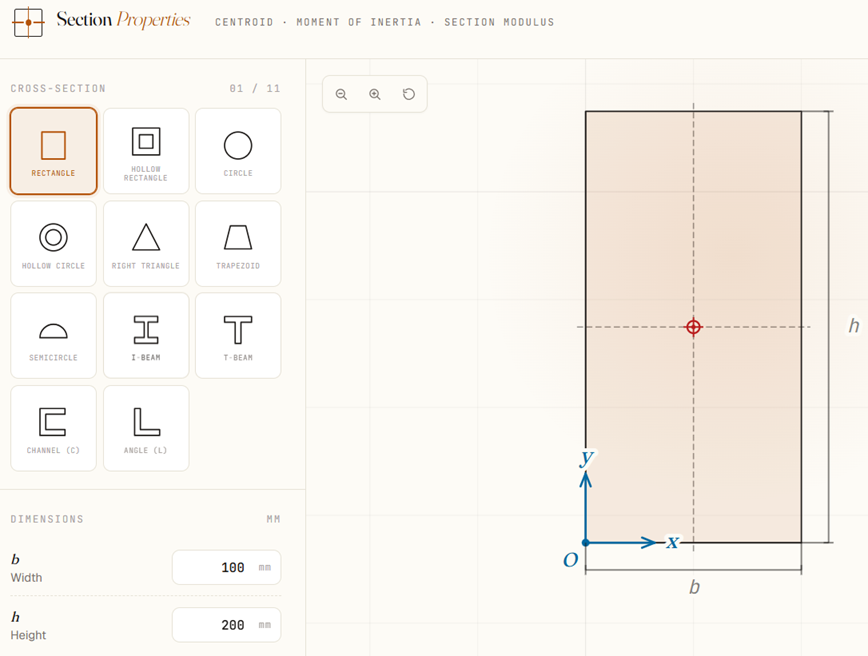
So I want to show you a small tool that does the arithmetic for you — and, more importantly, shows you the geometry while it does it. It's a free, browser-based section properties calculator, and it has quietly become one of the more useful things I keep open during a mechanics of materials lecture.
What it actually does
You pick a cross-section — rectangle, hollow rectangle, circle, hollow circle, right triangle, trapezoid, semicircle, I-beam, T-beam, channel, or angle — and type in its dimensions. That's the whole setup. There's no account, no install, nothing to download.
In return, you get a live drawing of the section with its centroid marked, its dimensions labelled, and (if you turn them on) its principal axes drawn right through it. Alongside the drawing, a panel computes everything you'd normally grind out by hand:
- Cross-sectional area and the centroid location (x̄, ȳ)
- Moments of inertia about the centroidal axes — Iₓ, I_y, the product of inertia I_xy, and the polar moment J
- Section modulus for the top, bottom, left, and right fibres
- Radius of gyration about each axis
- Principal moments of inertia (I₁, I₂) and the principal angle θ_p
Switch units between millimetres, centimetres, metres, and inches whenever you like — the numbers and the labels follow along. Every result is click-to-copy, which sounds trivial until you're halfway through a worked example and just want the number in your notes without a transcription error.
Why this matters for teaching, specifically
A calculator that spits out an answer isn't interesting. There are dozens of those. What makes this one a teaching tool is that the picture and the numbers are wired together, and you can drag the inputs around.
That coupling is where the learning hides. A few things I lean on it for:
Watching the centroid chase the material. Build a T-beam, then start fattening the flange. The centroid creeps upward toward the heavier region, in real time, while ȳ ticks up in the panel. Students stop seeing the centroid as a formula output and start seeing it as what it is: the place the area balances. One drag does more than a paragraph of explanation.
Making "distance squared" tangible. Take a rectangle and slowly increase its height while holding the area roughly constant. Iₓ explodes; I_y barely budges. Now the d² in the formula isn't a rule to memorize — it's something they just watched punish material that sits close to the axis and reward material that sits far away. This is the entire reason an I-beam looks the way it does, and you can let them discover it instead of asserting it.
Demystifying principal axes. Angles and channels are where students lose faith, because the section isn't symmetric and the product of inertia I_xy refuses to be zero. Turn on the principal axes and there they are — tilted, not aligned with the legs, exactly as the theory promises. Seeing θ_p come out as some awkward angle, and watching the axes rotate as you change the leg lengths, turns Mohr's circle from an abstraction into something with a picture attached.
Killing the silent arithmetic error. When a student's hand calculation disagrees with the tool, you have a teaching moment instead of a wrong answer. Did they forget to shift a piece back with the parallel axis theorem? Mix up b and h? The tool becomes a check, not a crutch — the way a graphing calculator checks an algebra step without doing the thinking for you.
It rewards a healthy kind of play
The best thing I can say about it is that students fiddle with it. Because changing a dimension is instant and free of consequence, they poke at it the way you'd poke at a physics sandbox. What happens to J if I make this circle hollow? How thin can the web get before I_y stops mattering? Why does the angle section behave so strangely?
That kind of low-stakes experimentation is exactly what builds intuition, and it's exactly what a static textbook figure can't offer. A figure shows you one section. This shows you the entire family, and lets the student be the one steering.
It's worth being clear about the boundary, too: the tool is for understanding and for checking, not for replacing the derivation. The day they need to integrate a section from scratch, or handle a built-up shape that isn't in the menu, they still need the method in their hands. Used well, the visual intuition they build here is what makes that method stick.
How to put it to work
A few ways it slots into a course without much effort:
- Live in lecture. Project it while you derive a result by hand, then change one dimension and let the class predict which way each number moves before you release the input.
- In problem sets. Have students compute a section by hand, then verify with the tool and explain — in a sentence — any discrepancy. The explanation is the assessment.
- For quick design feel. "Find a section under 50 cm² with the largest Iₓ you can manage." Suddenly they're discovering why depth beats width, on their own.
- For self-study. Send students the link. Because it runs in any browser with nothing to install, it works on a laptop, a tablet, or a phone on the bus.
Open it and drag something
Mechanics of materials is one of those subjects where the formulas are honestly not that bad once you can see what they're describing. The whole difficulty is that, traditionally, the seeing has been left up to the student's imagination.
This tool hands them the picture. Open it, build an I-beam, and start moving the flange — and watch the moment when "second moment of area" stops being three intimidating words and becomes something obvious.
Try the Section Properties Calculator →
Free to use, runs in any browser, and works just as well on a phone as on a lecture-hall projector.